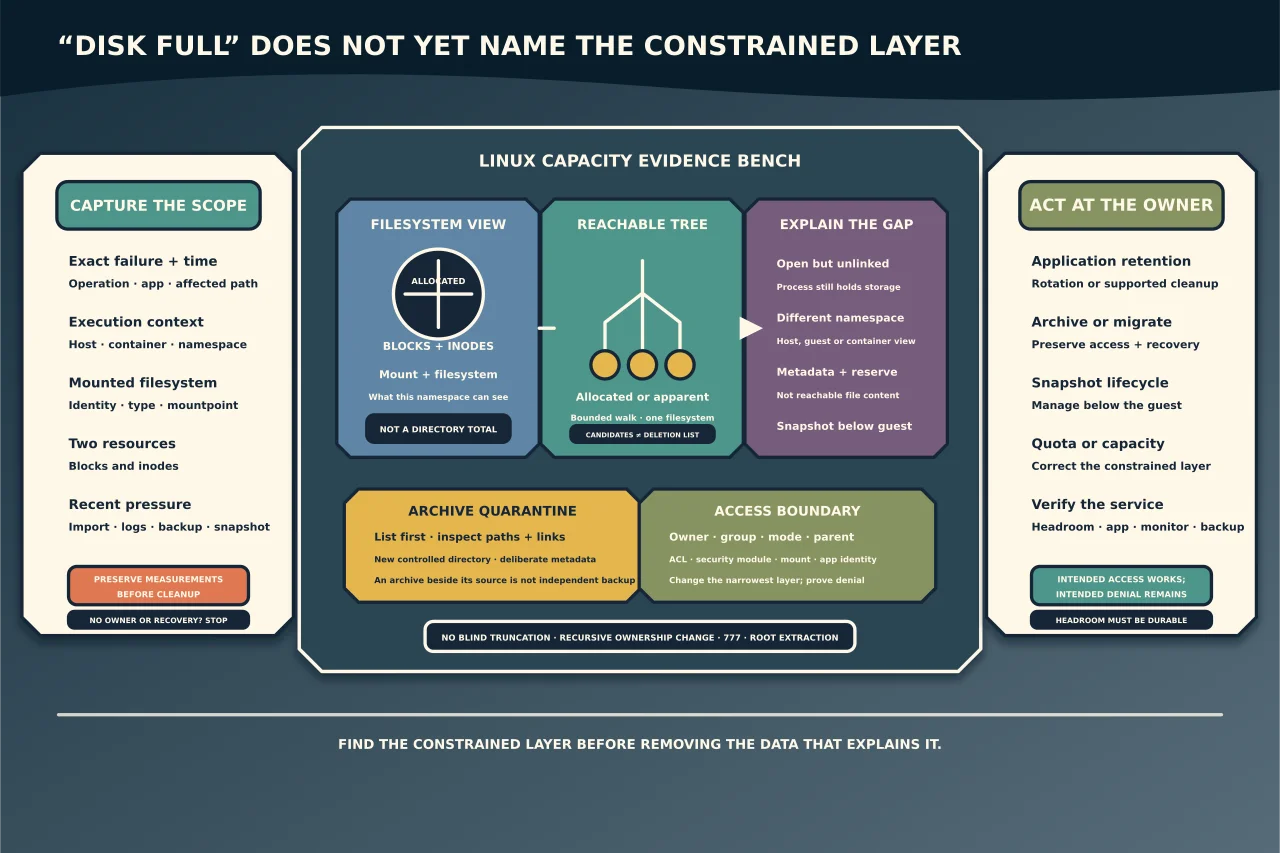
When Linux reports that a disk is full, the tempting response is to find something large and delete it. That is exactly when a careful diagnosis matters most.
“Disk space” can refer to several different things: blocks allocated by a mounted filesystem, inodes used by directory entries, logical file size, blocks referenced by reachable files, space retained by an open deleted file, or capacity consumed below the filesystem by snapshots and storage metadata. Fixing the wrong layer can remove valuable data without releasing the constrained resource.
Start by identifying what is full and why. Cleanup comes later, under the data owner’s retention and recovery rules.
Capture the problem before changing it
Record:
- the exact error and time;
- the affected application, operation and path;
- the host or container context;
- the mounted filesystem that contains the path;
- both block and inode utilisation;
- recent deployments, imports, backups, log bursts or snapshot activity; and
- whether writes are failing, slow or merely triggering a warning threshold.
A service can say “no space left on device” when the filesystem has free bytes but no free inodes. A container can see a different mount namespace or quota from the host. A database may enforce its own limit. Preserve that distinction.
Ask the filesystem with df
GNU df reports used and available space for mounted filesystems. Scope it to the affected path when possible:
df -hT /path/to/check
df -i /path/to/check
The first view reports block capacity in human-readable units and includes the filesystem type. The second reports inode use. Treat the mountpoint and filesystem identity as important evidence; a path may sit on a separate volume, bind mount, network mount or overlay.
df does not total the files under a directory. It reports the allocation known to the mounted filesystem. It also does not inspect an unmounted filesystem. In containers or restricted namespaces, its view may not match the host’s.
Ask the directory tree with du
GNU du walks named files and directories and estimates their space usage. A bounded first-level summary is often more useful than an unrestricted scan:
du -x -h --max-depth=1 /path/to/checkHere, -x keeps the walk on one filesystem and --max-depth=1 limits the report to the starting directory and its immediate children. Use a narrower path first. A deep walk over a huge, busy or remote tree can consume time and I/O during an incident.
Be clear about what you are comparing. Normal du output reflects allocated blocks for reachable files; du --apparent-size reports logical file length instead. Sparse files can have a large apparent size but consume fewer blocks. Hard links and link-following choices can also change totals.
Why df and du can disagree
A difference is not automatically corruption. Common explanations include:
- a file was deleted from its directory but is still open by a running process;
- the scan lacks permission to enter some directories;
duwas run in a container or different mount namespace;- sparse files, reflinks, compression or deduplication separate logical and physical use;
- filesystem metadata, journals or reserved blocks are not represented as reachable file content;
- storage snapshots retain older blocks below the live directory tree; or
- the two commands were sampled at different times on a changing workload.
For an open-but-deleted file, Linux removes the directory name but releases storage only after the final reference is closed. Evidence may appear through the owning process’s file descriptors. Do not restart or kill that process merely to reclaim space until you know what it is, whether the file is still being written and what service recovery requires.
Snapshots managed by LVM, ZFS, a hypervisor, storage appliance or cloud platform may be invisible to du inside the guest. Diagnose and manage them at their owning layer.
Find candidates without turning discovery into deletion
Begin with directory totals, then narrow. For a known local path, a read-only size search can identify large regular files:
find /path/to/check -xdev -type f -size +1G -printThis is a candidate list, not a deletion list. For each result, establish:
- application and data owner;
- whether it is live, rotated, archived or backed up;
- retention and legal requirements;
- whether another process has it open;
- whether deleting it will actually release the constrained layer; and
- how the application behaves if the file disappears.
Do not delete by age, extension or size alone. Do not truncate a live database, journal or application log. Prefer the application’s supported retention, rotation, archival or maintenance mechanism.
Read file metadata before changing access
stat reports a file’s type, owner, group, mode, size, timestamps and filesystem-related identifiers:
stat /path/to/checkTraditional permission bits apply to three classes—owner, group and other—with read, write and execute bits. Their meaning depends on object type:
- on a regular file, read allows content reading, write allows content modification and execute permits execution subject to other controls;
- on a directory, read concerns listing names, write concerns adding/removing directory entries, and execute means search/traversal; and
- ownership, parent-directory access, ACLs, security modules, capabilities, immutable attributes, mount options and application policy may add further controls.
Therefore “permission denied” is not solved reliably by making everything writable. chmod -R 777 removes meaningful boundaries, can expose credentials or executable content, and may still fail when the real control is an ACL, SELinux/AppArmor rule, read-only mount or application identity.
Before a change, record the current owner, group, mode, relevant ACL/security context, parent-directory permissions and service account. Change the narrowest object at the authoritative layer, then verify both intended access and intended denial. Avoid blind recursive chown or chmod: links, mountpoints and mixed application data can make the blast radius much larger than the typed path suggests.
Treat archives as data plus metadata
A tar archive can contain names, directories, symbolic or hard links, ownership, modes and timestamps as well as file content. Extraction is a write operation; it can create paths and may overwrite existing data.
List an unfamiliar archive first:
tar -tvf /path/to/archive.tarReview:
- top-level layout and unexpected absolute or parent-style paths;
- member types, including links and device-like entries;
- owner/group identifiers and permissions;
- files that would collide with existing content; and
- whether the archive actually contains the required data.
For inspection, extract into a new controlled directory rather than the working directory or application tree. GNU tar’s --one-top-level can create a containing directory:
tar --extract --file=/path/to/archive.tar --one-top-level=/path/to/new-directoryUse a path intended for this inspection and ensure it has enough capacity. Do not extract as root merely for convenience. A privileged extraction can restore ownership and protection information that is inappropriate or unsafe on the destination. Current umask, tar options and privilege affect the resulting metadata.
After extraction, inspect the tree and metadata before moving anything into service. A restore may need exact ownership and modes; a document handoff may deliberately need new ownership. Make that decision explicitly.
An archive is not automatically a backup
A tar file stored on the same filesystem as its source shares that filesystem’s failure and capacity risk. An archive may also be incomplete, corrupt, encrypted without a recoverable key or captured while an application was inconsistent.
A useful backup has a defined scope, independent failure boundary, protected access, retention, integrity evidence and a recovery process. For databases and other stateful services, use the application’s supported backup or quiescing method rather than assuming a file-level archive is consistent.
A safe capacity response
Once the evidence identifies the owner and layer:
- Stabilise the workload if writes are failing, using its supported procedure.
- Preserve the measurements and candidate list.
- Confirm recovery and retention requirements.
- Select the smallest action at the correct layer: application retention, log rotation, archive/migration, snapshot lifecycle, quota correction or capacity expansion.
- Record what will change and how to stop or recover.
- Verify block and inode headroom, application health, monitoring and backups afterward.
The outcome is not “df is below 80%”. It is that the affected service works, the data owner accepts the action, the constrained resource has durable headroom, protection still runs, and the cause will be visible before the next emergency.